Providers sometimes need more information about an identity or a transaction before they can act — a request for information, or RFI — and they send those requests by email. Use more than a couple of providers and the requests scatter: different senders, different threads, different inboxes, each needing its own follow-up. RFI case management collapses all of that into one place. Point every provider at your organization’s dedicated RFI inbox address, and each request becomes a case in a single queue — one source of truth across all your providers, with a workflow to respond, attach documents, link the identity or transaction the request is about, and resolve. Like reconciliation, it makes the whole network as easy to operate as a single provider: you stop chasing threads across inboxes. It’s also a place your team works together. Instead of requests buried in individual inboxes, or a separate portal per provider showing only that provider’s requests, everyone you invite to the platform sees the same cases, threads, and statuses. This guide covers pointing your providers at the inbox, replying and attaching files, linking records, and resolving cases.

Before you start

Cases appear automatically once a provider emails your organization’s dedicated RFI inbox address — there’s no manual “create case” step. You’ll set that up in the first section below. No specific role or permission is required to view, reply to, resolve, or link cases; any authenticated platform user can take these actions.

Connect a provider

Before a provider’s RFI emails will show up in the platform, you need to share your organization’s inbox address with them.
  1. Go to Cases under RFIS in the left nav.
  2. On the RFI Cases page, find the Connect a provider card. It reads: “Share this address with your providers so their RFI emails appear here automatically.”
  3. Click the copy icon next to the address to copy it to your clipboard, then send it to your provider contact.
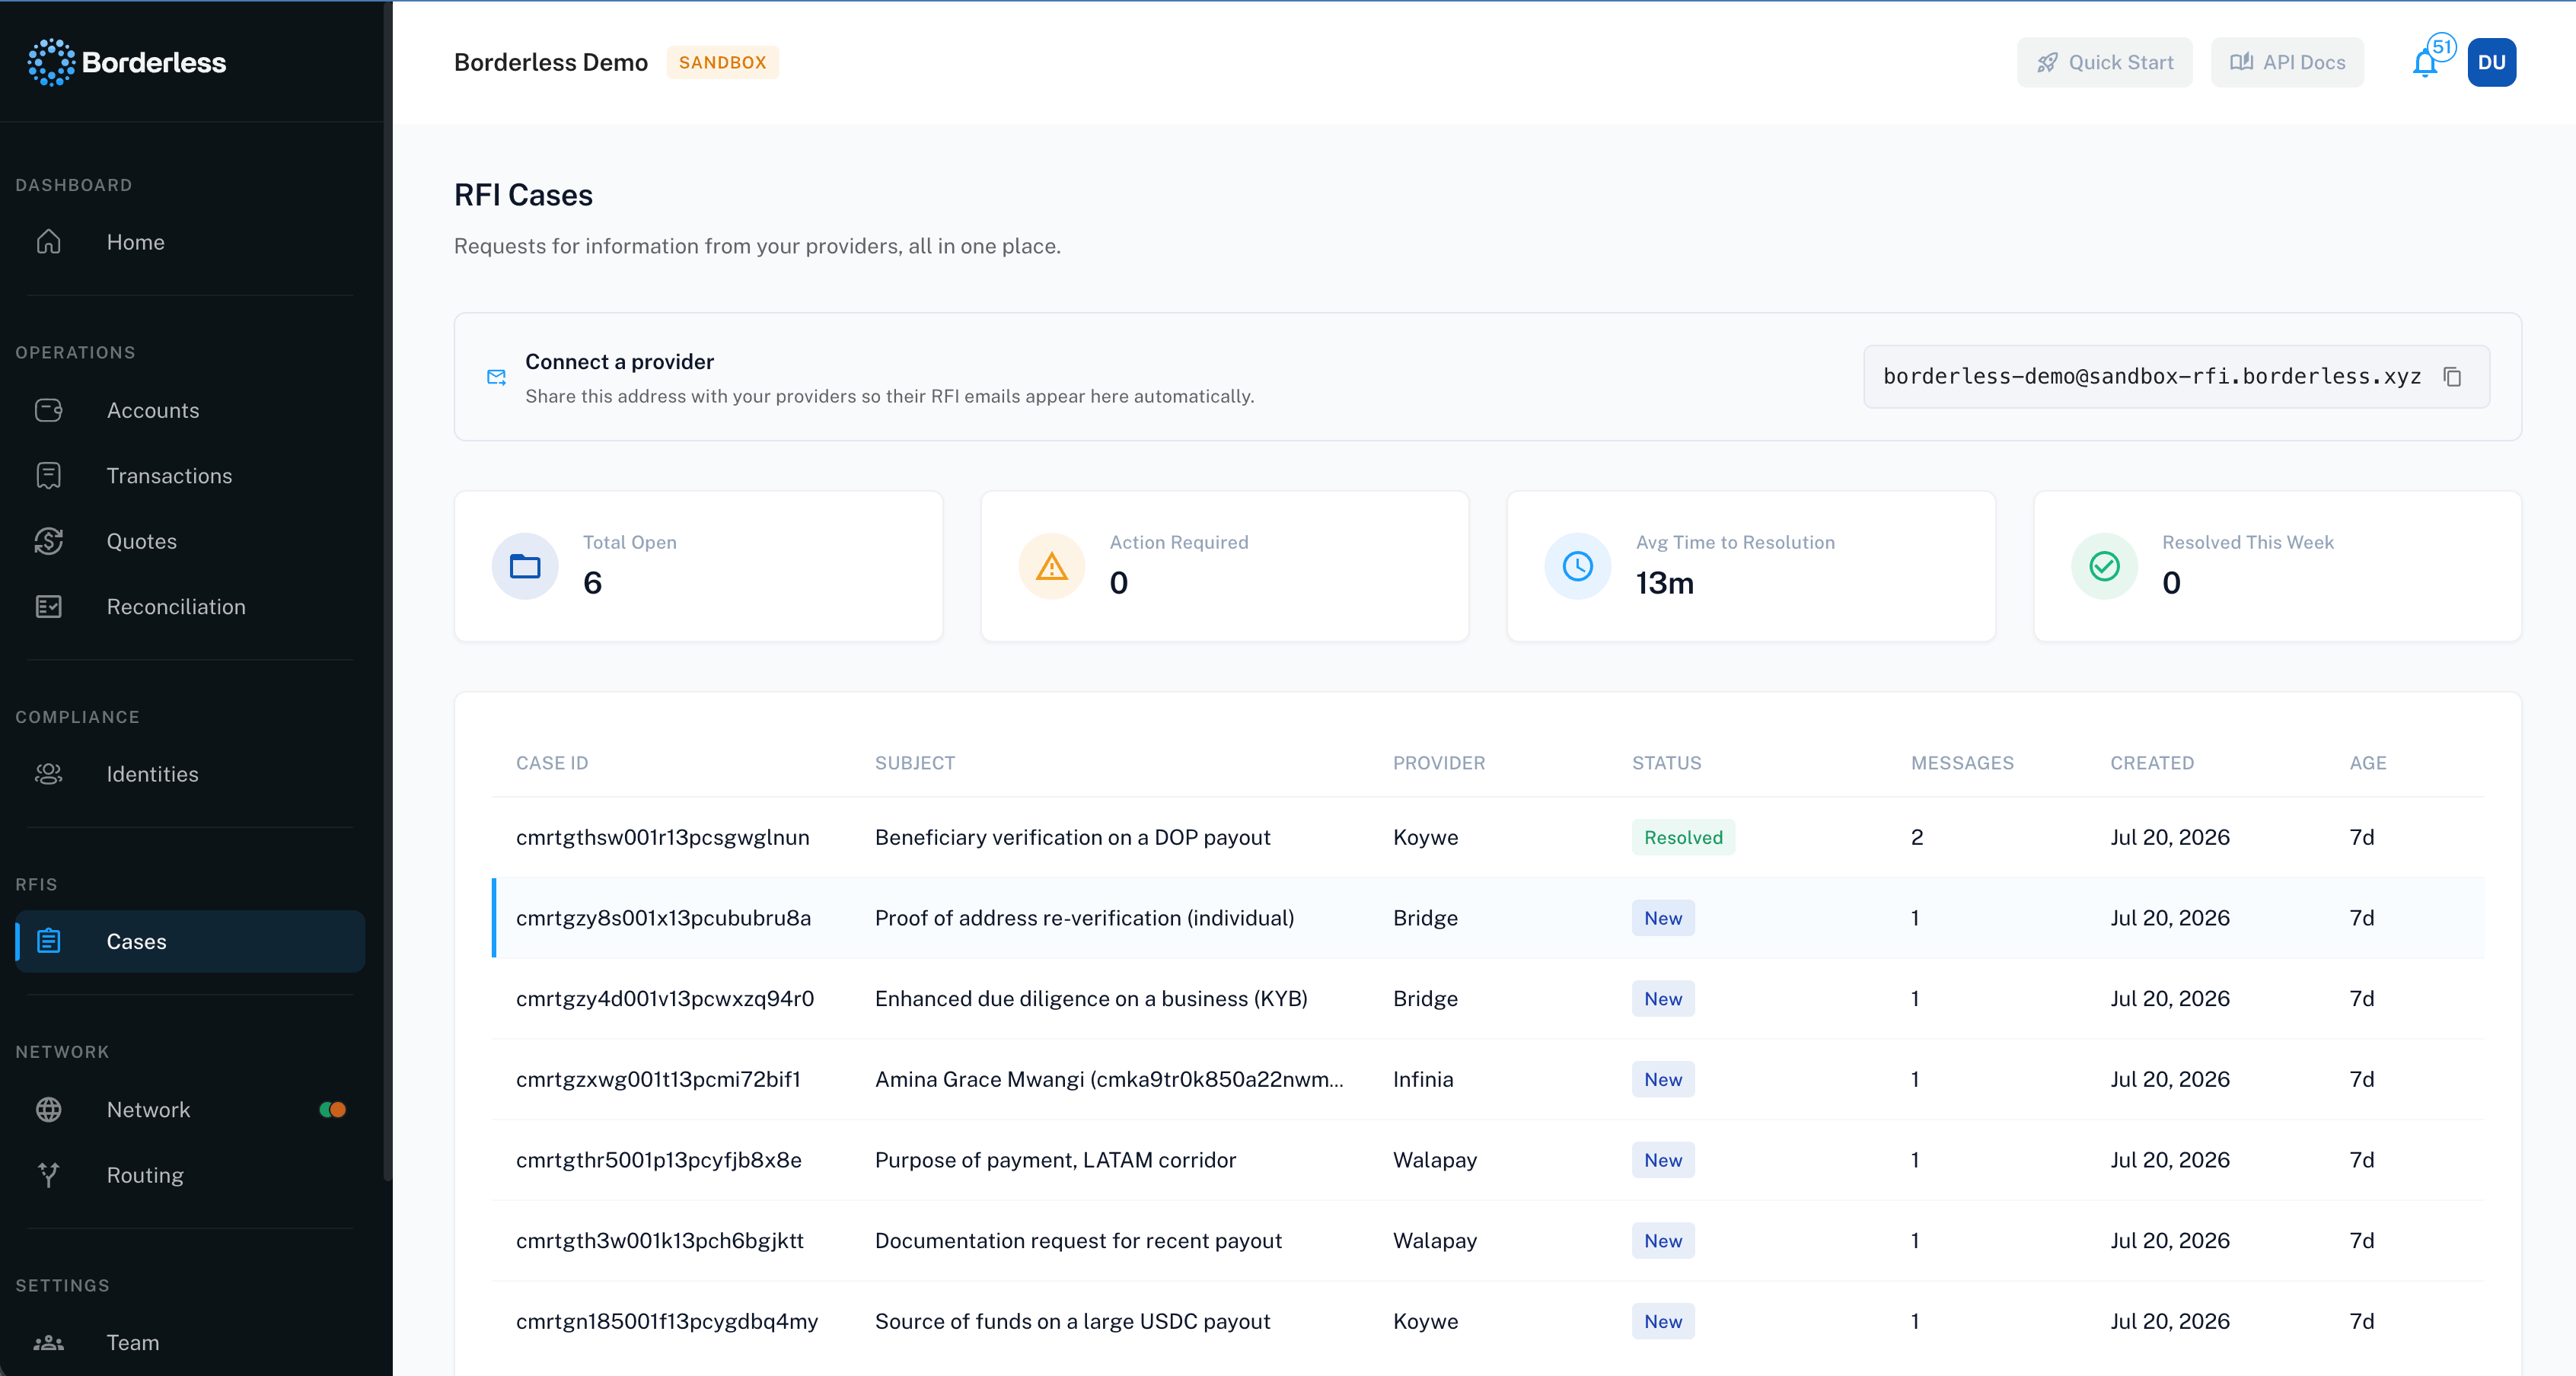
RFI Cases page with the Connect a provider card, summary stats, and the case table Once a provider emails that address, a case appears in your list automatically — you don’t need to do anything else to create it. The inbox address’s domain reflects the environment you’re in — production addresses end in @rfi.borderless.xyz, sandbox addresses end in @sandbox-rfi.borderless.xyz. If you’re comparing addresses across a production and a sandbox organization, expect the domain to differ.

Find and review cases

The RFI Cases page lists every case, provider and Borderless team messages included, with four summary stats at the top: Total Open, Action Required, Avg Time to Resolution, and Resolved This Week. The case table below the stats shows: CASE ID, SUBJECT, PROVIDER, STATUS, MESSAGES, CREATED, and AGE. Click anywhere in a row to open that case — there’s no separate “view” button. Each case carries one of four statuses: If there are no cases at all — whether because no provider has emailed the inbox yet or for any other reason — the table reads “No RFI cases yet.”

Case details

Open a case and look at the Case details card on the right for a quick reference summary: Status, Case ID (click to copy it), Type, Provider, Created timestamp, Age, Resolved timestamp (blank until the case is resolved), and counts for Messages and Attachments. Type shows one of three values — Compliance, Transaction, or Unknown — reflecting what kind of request the provider sent.

Reply to a case

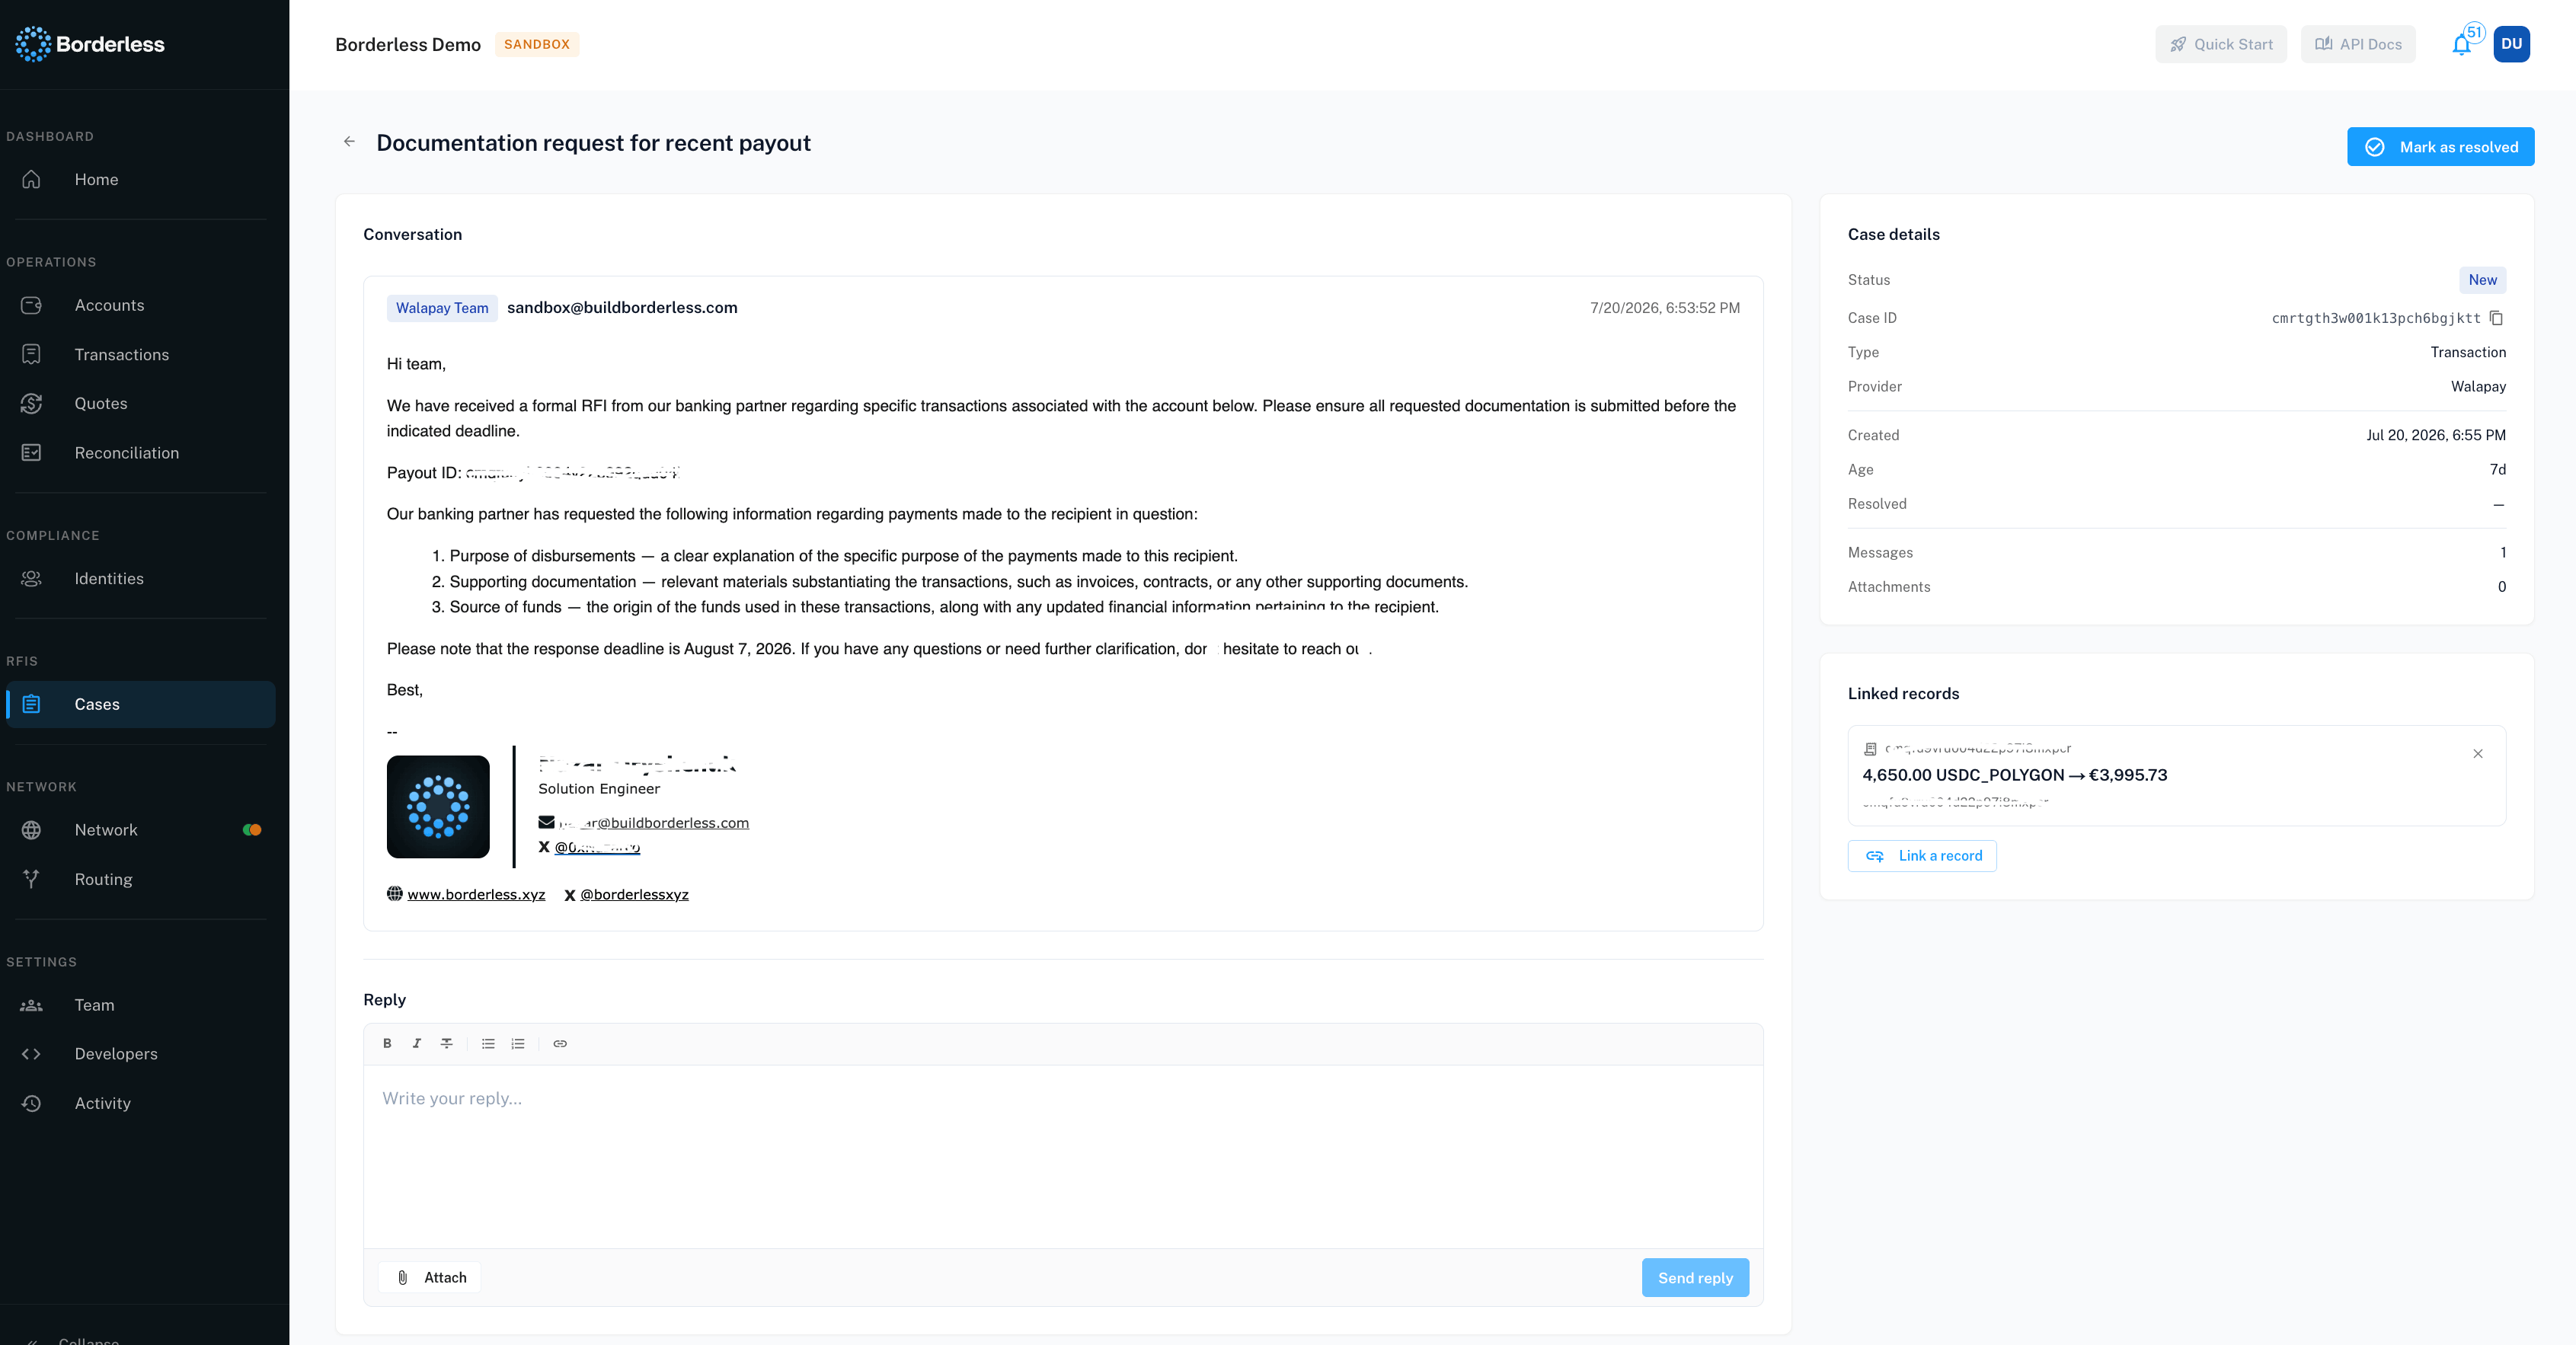
  1. Open the case from the list. (Use the back arrow in the header to return to Cases at any point.)
  2. In the Conversation card, review the message thread. Each message carries an origin chip — the provider’s name with “Team” appended (for example, “Acme Corp Team”), or plain “Provider” if no provider name is on file; “Your team” for your own replies; “Borderless Team” for messages from Borderless staff. Next to the chip you’ll also see the actual sender — their email address for provider messages, their name for your team’s messages. If a message includes quoted email history, click Show quoted history to expand it (or Hide quoted history to collapse it again).
  3. To open a file a provider or teammate attached, click its chip — this opens the file in a new tab.
  4. Under Reply, write your response in the text box (placeholder: “Write your reply…”). This field is required.
  5. To attach a file, click Attach, then choose one or more files. Each one uploads as soon as you select it and shows a spinner while it’s uploading.
  6. Click Send reply.
Case detail page showing the Conversation thread and the Reply composer Send reply stays disabled until you’ve written something and every attached file has finished uploading. If a file fails to upload, its chip turns red and you’ll see “Unable to upload this file. Please try again.” — remove it (click the “x” on the chip) and try again, or send without it. A successful reply shows “Reply sent.”

Mark a case as resolved

Click Mark as resolved in the case header. The button relabels to Resolved and stays disabled once the case is closed. Resolving isn’t permanent: if the provider sends a new message on a resolved case, it reopens automatically. The case detail page notes this directly: “This case is resolved. It will reopen automatically if the provider sends a new message.” The Reply section stays visible (just disabled) while a case is resolved, rather than disappearing. A successful resolve shows “Case marked as resolved.” Linking connects a case to the identity or transaction it’s about, so your team has full context when replying.
  1. On the case detail page, find the Linked records card on the right.
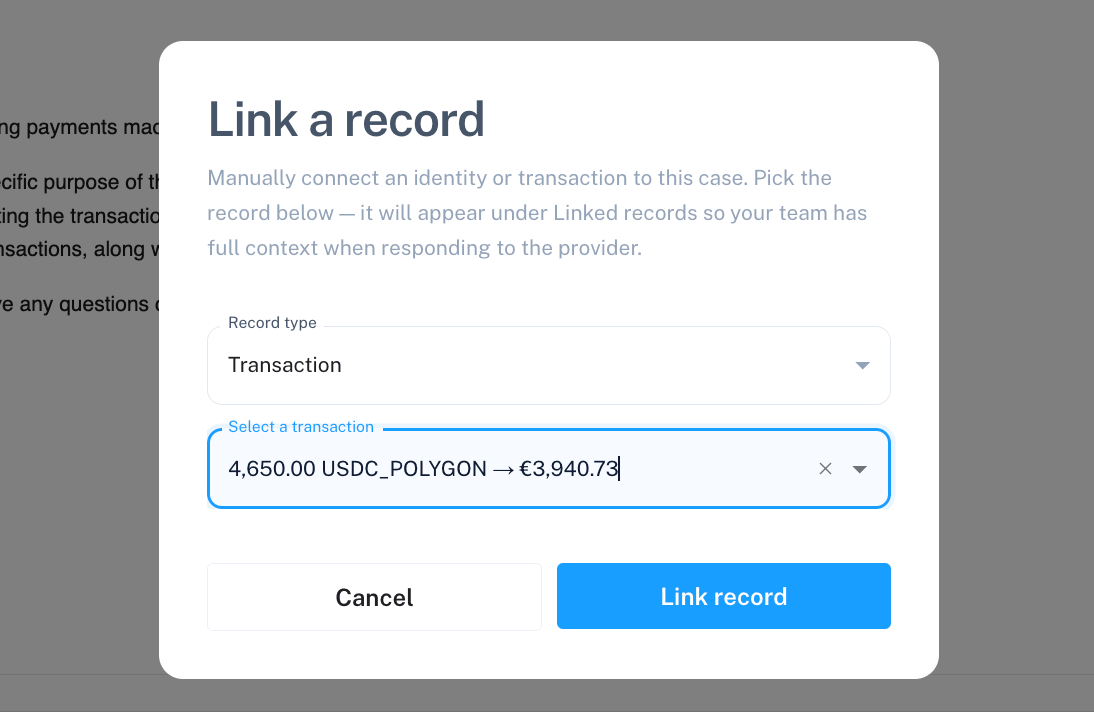
  2. Click Link a record.
  3. In the Record type field, choose Identity or Transaction.
  4. In the field below it — labeled Search identities or Select a transaction, depending on your choice in step 3 — search for and select the record. Identity search matches by name as you type.
  5. Click Link record.
Link a record modal with Record type and search fields Link record stays disabled until you’ve selected something. A successful link shows “Record linked.” Changing Record type clears whatever you’d already selected, so pick the type first. To remove a link, click the unlink icon on that row in Linked records. This removes it immediately — there’s no confirmation step. A successful unlink shows “Record unlinked.” If no records are linked yet, the card reads: “No records are linked to this case yet. Link an identity or transaction so your team has full context.” Linked records only shows records once they’re fully matched — a reference tied to a record that’s still ambiguous or unmatched stays invisible in this card, even though it exists behind the scenes. If you expect a link to appear and don’t see it, that’s the likely reason.

Troubleshooting

The case list won’t load. You’ll see “Unable to load RFI cases. Please check back shortly.” Refresh the page after a moment. If it persists, contact your Borderless representative. A case won’t open. “Unable to load this RFI case. Please check back shortly.” means the same as above — retry shortly. “RFI case not found.” The case may have been removed or the link is wrong. Go back to Cases and find it from the list. My reply won’t send. Check that the message body isn’t empty and that every attached file has finished uploading (no spinner showing on any chip). If you still get “Unable to send reply. Please check back shortly.”, wait and try again. An attachment won’t download. “Unable to download this attachment. Please check back shortly.” — retry the click after a moment. Resolving or linking a record failed. Each of these actions has its own retry-shortly message (“Unable to resolve this case…”, “Unable to link this record…”, “Unable to unlink this record…”). These are typically transient — try again in a moment. The copy button didn’t work. If copying the inbox address fails, you’ll see “Unable to copy the address.” — copy it manually by selecting the text instead. An inline image, like a logo in an email signature, isn’t showing up as an attachment. That’s expected — inline images render directly in the message body rather than as a separate downloadable file.