

Set up
Let’s get you set up to begin sending requests to Borderless.Access to Borderless
Please contact us via email if you are not already in touch for onboarding. During your onboarding we will configure your selected partner finanial institutions (PFIs) who facilitate your on-ramping and off-ramping for stablecoin payments. Borderless will configure your organization in our system and invite your first user via email or Slack.Once you receive this invitation, you can use it to set a password, and invite additional team members to the organization via your Borderless dashboard. Here you will have options to manage roles, configure organizational settings, and reset your password.
Create API keys
In the Borderless dashboard, you’ll be able to generate your API keys to continue the integration and testing.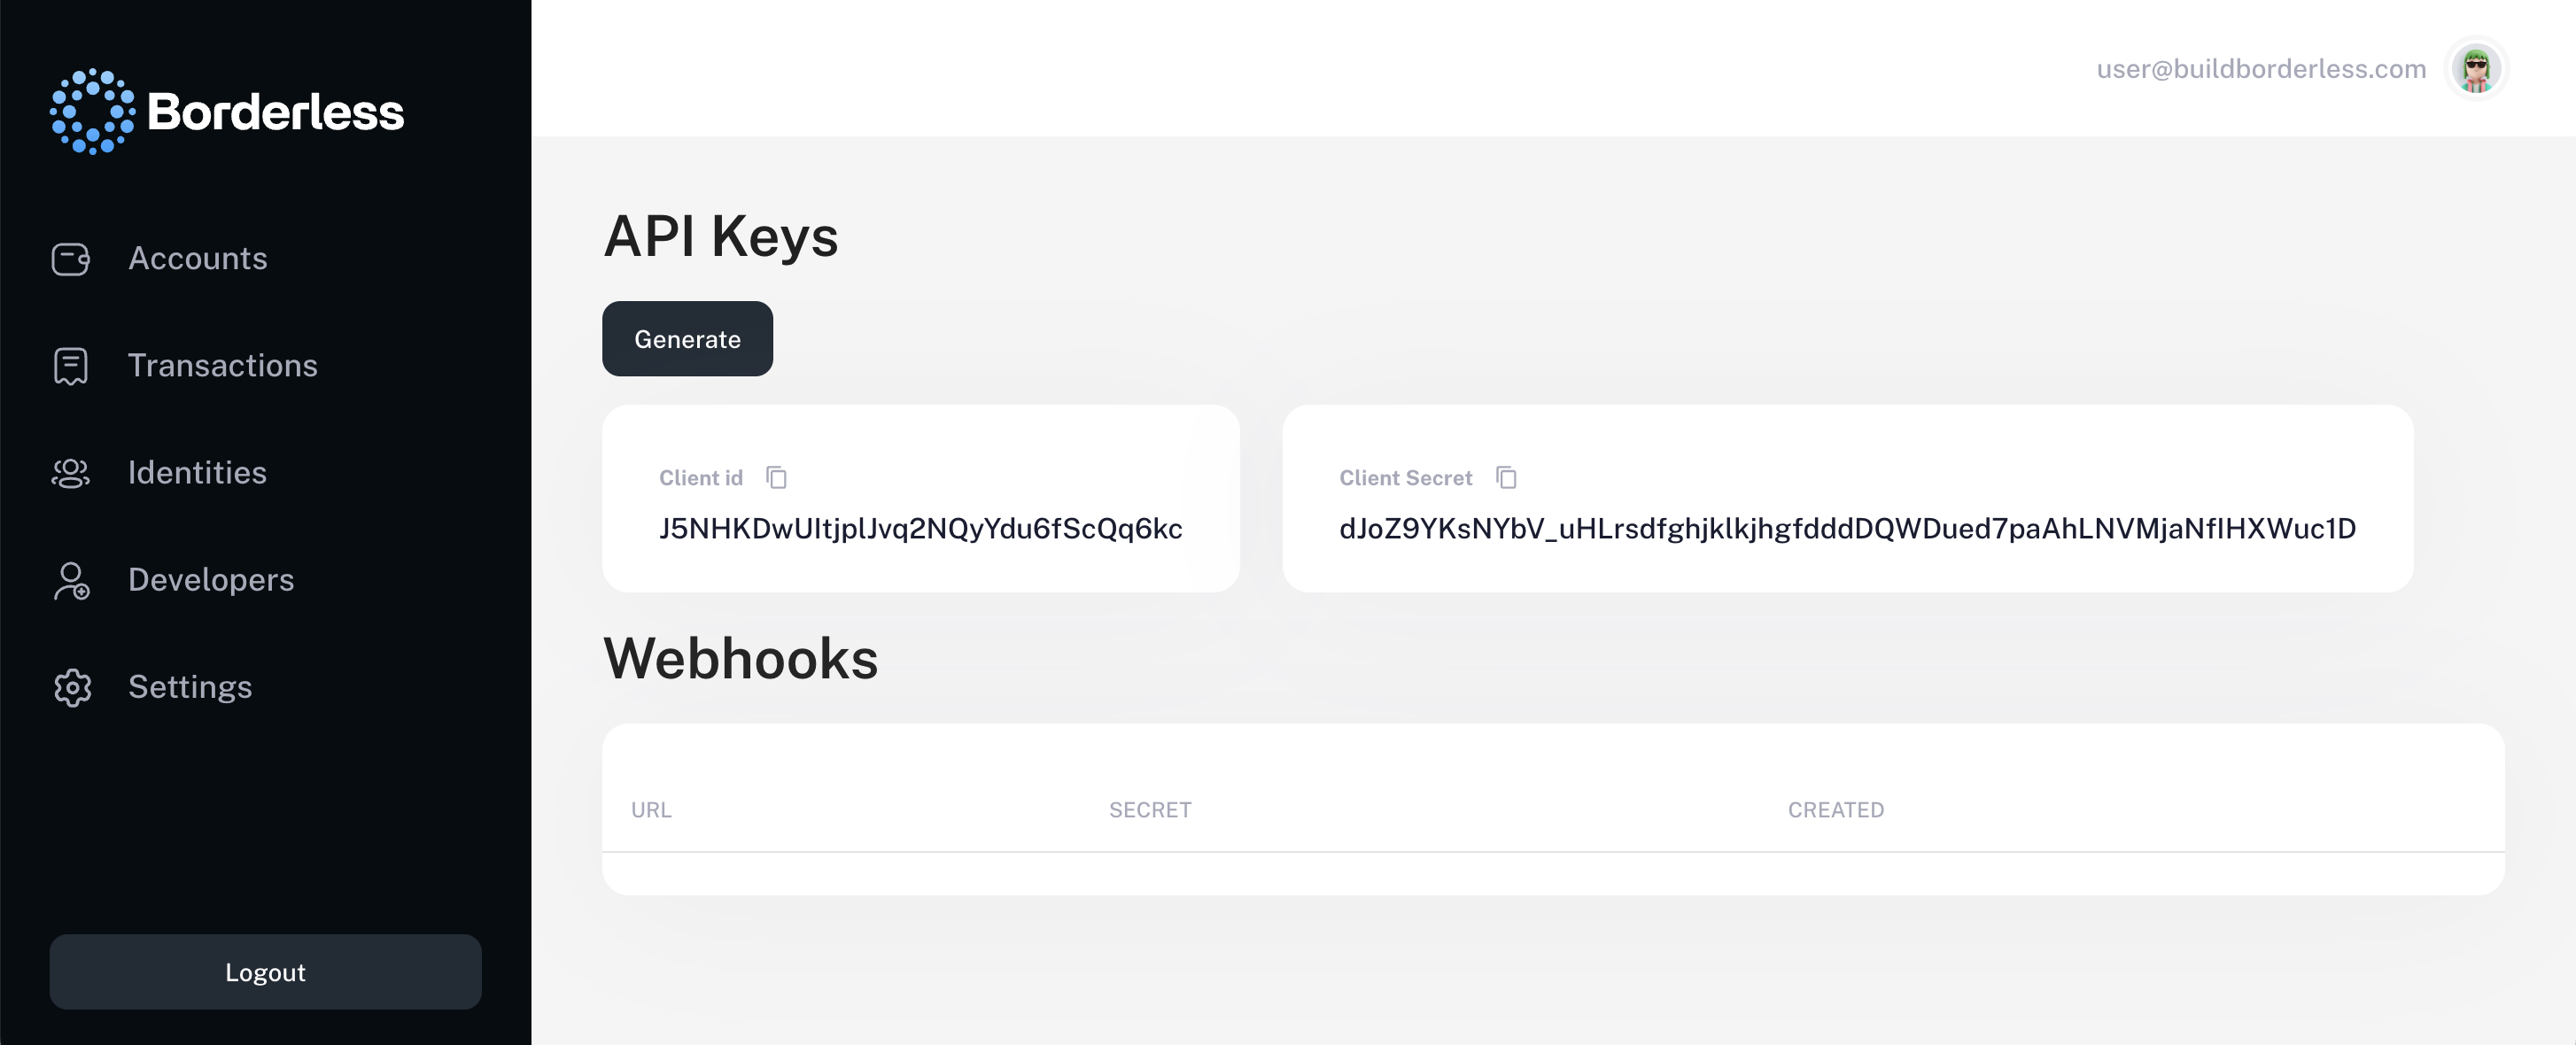
Developers section on the left hand navigation panel. Click the Generate button and copy your API keys.Create access token
With your API keys from the previous step, you can generate an access token to authenticate future API requests. Authentication is enforced via OAuth 2.0. All endpoints require verified bearer tokens, and webhook communications are signed for end-to-end trust.In your request body, include your
Client ID and Client Secret, which you generated in the Developers section of the Borderless Dashboard.Identities & compliance
Quickly establish identity objects and understand how to initiate compliance.Create first identity
Every transaction on the Borderless network is associated with an
identity and then linked to Borderless accounts for secure transactions.There are two types of identities:- Personal Identity – Represents an individual (natural person). Used for account holders, directors, or ultimate beneficial owners (UBOs). Subject to know your customer (KYC) checks.
- Business Identity – Represents a legal entity (company, organization, or institution). Required for clients performing business transactions or onboarding as a financial partner. Subject to know your business (KYB) checks.
identity object to represent a user in your system. An identity includes essential information (PII) about each customer, such as their name, email, and documents required for the KYC or KYB process.This compliance process is managed by our partner financial institutions (PFIs), who serve as the the locally licensed and regulated stablecoin and fiat on-ramps and off-ramps.Some requests require an Idempotency-Key header to ensure that operations are not accidentally executed multiple times. Please generate and use a unique UUID for this field. If you have additional questions about the Idempotency-Key you can review more in the API Reference.The following request will create a new identity object. Below is a full example showing all supported fields for a business identity.Please replace
your-access-token with the actual token you’ve received on Step 3.Please capture identity
id from the response to use it during account creation later.Gather configured PFIs
Once an identity has been created, they will have limited ability to transact until they pass a KYC or KYB check with the on-ramp and off-ramp providers (PFIs) they’d like to enable. You can easily gather the configured PFIs from our API before collecting the necessary documents and initiating a compliance check. Additionally, this endpoint provides the terms of service link, where required, which will need to be forwarded to the client.Some of our partner financial institutions (PFIs) require users to accept their terms and conditions before they can transact. Each identity must accept their own ToS link, and it cannot be reused.
Please use the identity
id from the response above.Please capture compliance
slug from the response to use it next.Please capture terms of service
link to deliver to end users.Check required documents
With the identity
id and compliance slug you can now check the list of required information and documentation needed for the configured PFIs. This allows you to dynamically build your UI such that you only ask your customers for what is required for each specific business or user.It is important to remember that the compliance slug is an identifier that represents a specific combination of provider and country coverage. This allows us to dynamically get a tailored list of required documentation for the client use case.Please use the compliance
slug from the response above.Attach required documents
Now that required documents have been identified, and the terms of service link, if required, has been accepted, we can submit these documents for review via our API. This information will be added to the identity object so that we can streamline and orchestrate future compliance as well.For clarity, the
id parameter here is the identity id of the organization or person you have created in step 1 of this process. This will upload the information to be associated with the id for the compliance check. You can use this endpoint at any time to add documents to the related identity object.Please note,
imageFront and imageBack should be converted in base64 format with resolution at least 200*200pixels.Start compliance check
After attaching the required documents to the identity object, you are ready to submit and start the compliance check with our partner financial institutions (PFIs).You will need to initiate compliance checks for each of the compliance slugs that the identity will want to transact via. Borderless will maintain the info/documents uploaded for identities, meaning you will not need to re-upload the same info/documents if they are required to initiate compliance checks with different compliance slugs.If all prerequisites are satisfied, the check will begin. Use the GET request above from step 2 and the API will return the current compliance status.The timeline for different compliance checks varies by both provider and type of identity. For personal identities, providers generally provide approvals within the span of a few hours or less, with some being near instant. For business identities, providers generally provide approvals within the span of 1-4 days. We will keep you informed during the whole process via the returned compliance status in the response body of step 2.
Requests for information (RFIs) are a regular part of the compliance process. If there are follow up questions on documents, completely missing documents, or other details that need to be reviewed manually, our PFIs can send a request for additional information.
These requests for information will be communicated manually, and are generally expected to be resolved in 24 to 48 hours.
These requests for information will be communicated manually, and are generally expected to be resolved in 24 to 48 hours.
Accounts
Each identity needs to be configured with accounts to interact with their funds.Create an account
At a high level, an account is a structure that is owned by an identity and has the underlying infrastructure or connectivity to interact with stablecoins or fiat. It is important to configure this correctly.This can take a handful of shapes, but an identity will generally link a stablecoin wallet provider such as Fireblocks, Utila, Dfns, Fordefi, Metamask, or others. We have also expanded the concept of accounts to include fiat balances held with the PFIs such as Finity. You can link your Finity fiat balance as well, to initiate actions on those funds such as bulk fx conversions, ahead of fiat payments that are executed over a longer period of time.It’s also important to know we support sub-accounts. Sub-accounts function the same way as standard accounts but follow the configuration and rules defined by the primary account. Throughout this documentation, the term Account refers to both accounts and sub-accounts, unless explicitly stated otherwise.Let’s create our first account. For this example we will use a Standalone Account type, but feel free to explore the others in the Accounts & Wallets section. After this, we will need to add stablecoin assets.
We are using an example below for standalone wallet infrastructure, but please review additional examples with all of the different infrastructure options in the Accounts & Wallets section of the docs.
It is important to note, Borderless is never in the flow of funds. These accounts are either custodied with the PFI, the wallet provider, or self-custodied by the identity itself. We do not provide any form of custody and we never initiate any movement of funds on behalf of the identity.
Please capture account
id from the response to use it as needed later.Add new assets to account
With an account set up for this identity, it’s necessary to add assets to the account. Specifically, these assets are the stablecoin funds that will be used to initiate off-ramp payments into local fiat currencies, such as USDC or USDT. These accounts will also be used to receive funds when on-ramping payments between local fiat currencies and stablecoins.Please note that when you add new assets to your account, this is a configuration for the stablecoin wallet infrastructure to track these assets correctly. This does not mean you are sending real stablecoin funds to this account with this endpoint. Borderless is fully non-custodial, you will need to transfer your stablecoins directly to this wallet address yourself, or receive funds from an on-ramp transaction.
Please use the account
id from the response to the previous request above.Transactions
Let’s walk through on-ramp (deposit) and off-ramp (withdrawal) payment examples.It is important to note, Borderless is never in the flow of funds. These transactions are executed directly between the PFI, and yourself (the client). We do not provide any form of custody and we never initiate any movement of funds on behalf of the identity. Borderless is strictly a connectivity technology solution to streamline integrations.
On-Ramp (Deposit)
On-ramping is convertingfiat currencies into stablecoins such as USDT or USDC. This conversion is facilitated by the PFIs on the Borderless network and can be part of either a payin or payout flow simply depending on if you are sending or receiving the payments. In this scenario you are ultimately sending or receiving stablecoins, after the local fiat currencies are converted at the PFI.
On-ramps are a simple 3 step process.
Optionally, you can also request a quote before initiating the on-ramp to have a transparent view of the estimated fees and exchange rates.
Create a deposit transaction
First, you will initiate an on-ramp transaction. This will return the payment instructions from the PFI, for the payment originator to send the local fiat currency. This alerts the PFI to expect the payment, and allows them to attribute the funds to your account when they arrive.
Please use account
id in the on-ramp creation request from an account created above in the Accounts section.Please note: if KYB or KYC are in progress, you’ll see
"instructions":null in the response. To fetch the payment instructions after order creation, you can subscribe to a Webhook or use GET /transactions/{id}using the on-ramp id from the response.Webhook details can be found in the API reference here.Send local fiat direct to PFI
Second, the payment originator follows the payment instructions that were returned in the first step, and sends the local fiat to the PFI directly. This step takes place directly with the PFI, over traditional local rails such as ACH, Wire, or PIX depending on region.
Release stablecoins to beneficiary
Third, the PFI will issue the stablecoins to the specified stablecoin wallet, as defined in your account set up above in the Accounts section. Once the stablecoins are received, this completes the on-ramp or deposit flow.You can easily track the status of transactions, request cancellation of transactions, and export transactions with the following endpoints.To track the status of your deposit transactions and other types of transactions:To request a cancellation of your deposit transaction and other types of transactions:To export your transactions:Congratulations! You’ve now completed your first stablecoin payment!
Please ensure you are using the transaction
id value which you will receive from the request to create a transaction such as the first step in this sequence on the /deposits endpoint.We recommend listening to the statuses via Webhook. Webhook details can be found in the API reference here.
Off-ramp (Withdrawal)
Off-ramping is convertingstablecoins into fiat currencies such as USD or BRL. This conversion is facilitated by the PFIs on the Borderless network and can be part of either a payin or payout flow simply depending on if you are sending or receiving the payments. In this scenario you are ultimately sending or receiving local fiat currencies, after the stablecoins are converted at the PFI.
An important note on payment instructions below.
Create payment instruction
First, create payment instructions to share with the partner financial institution (PFI) who is off-ramping or processing your withdrawal. This step is critical to ensure the local fiat currency arrives in the correct account at the end.
Please use an account
id in the Payment Instruction creation request from an account created above in the Accounts sectionPlease capture payment instructions
id from the response to use it for the withdrawal request after.Create a withdrawal transaction
Second, you will create a withdrawal transaction. This will send the payment instructions to the PFI, who will send the local fiat currency upon receipt of the matching amount of stablecoins. This alerts the PFI to expect the payment, and allows them to attribute the funds to your account when they arrive.It’s important to note that in the response to this withdrawal order, the PFI will return the onchain stablecoin payment instructions (generally a deposit address) that will handle the stablecoins which are being off-ramped.
Please capture the onchain instructions from the PFI in the response field
onchainInstructionTransaction to use it to send stablecoins in the next step.Please use both the account
id from an account created above in the Accounts section, and the payment instructions id in the withdrawal creation request from the step above where you created the payment instructions.Send stablecoins direct to PFI
Once the local fiat payment instructions are sent to the PFI, and the withdrawal transaction is initiated, this order will remain open until the PFI receives the stablecoins as outlined in the instructions they shared via response to the withdrawal request. At the time the stablecoins arrive, the PFI will send the local fiat transfer as defined in the payment instructions.
Release local fiat to beneficiary
Finally, when the partner financial institution (PFI) receives the stablecoins, they will then issue the local fiat payment to the bank defined in the payment instructions. Once the local fiat currency is received, this completes the off-ramp or withdrawal flow.You can easily track the status of transactions, request cancellation of transactions, and export transactions with the following endpoints.To track the status of your withdrawal transactions and other types of transactions:To request a cancellation of your withdrawal transaction and other types of transactions:To export your transactions:Congratulations! You’ve now completed your first stablecoin withdrawal!
Please ensure you are using the transaction
id value which you will receive from the request to create a transaction such as the first step in this sequence on the /withdrawals endpoint.We recommend listening to the statuses via Webhook. Webhook details can be found in the API reference here.
Dashboard
The unified admin and operations command center.Review all transactions in one home
Easily view a consolidated record of all global payments across all of your enabled partner financial institutions (PFIs). No more juggling multiple dashboards, with inconsistent data. Click into any of the transactions for more detail such as the stablecoin transaction hash, fees spent, and more.
Explore configured coverage
As our clients grow, we often see expansion into new stablecoin / fiat corridors and support for more regions. You can quickly check what regions, local fiat rails, and stablecoins are supported with the PFIs you have currently enabled. With this reference, teams can identify low hanging growth opportunities to expand into regions you already have support for, that you may not actively service today.
Expand with new PFIs
With the Borderless Provider Marketplace*, the Dashboard allows you to track PFI activations, connect to new PFIs easily, and see which other PFIs are available for you. This unlocks the ability to easily add redundancy to your service, reducing risk of downtime.
Manage identities
Identities are core to how Borderless orchestrates payments across a multitude of providers. In the Borderless dashboard, we present a streamlined view of all identities, their compliance statuses, and options to manage them.
Compare rates
With the ability to connect across multiple providers who service overlapping stablecoin payment corridors, Borderless is uniquely positioned to provide layers of intelligence. One simple example of this is allowing you to compare rates to drive your order routing decisions. This type of intelligence is a core focus for the team with more to come soon.
If you have any questions, please don’t hesitate to reach out to us via email or slack.